Elements of the 2nd Bavarian Division vs
Austria’s 2nd Brigade, Light Division.
About 11am on the 20th of April 1809, leading
elements of the 2nd Bavarian Division, under Lieutenant-General Karl
Philipp von Wrede, engaged an advance guard Radetzky’s brigade of the Austrian Light
Division, under Feldmarschall-Leutnant Emmanuel von Schustekh-Herve.
In the pre-dawn darkness of the morning of 20 April,
Napoleon mistakenly assumed that the bulk of Archduke Charles' army lay in
front of him. Accordingly, he gave orders for a drive southeast in the
direction of Landshut. Lannes' mission was to turn the Austrian right flank by
pushing south toward Rohr. General of Division Dominique Vandamme would attack
Siegenburg with his small Kingdom of Württemberg corps. Lefebvre's other VII
Corps divisions, together with General of Division Joseph Laurent Demont's Reserve
Division of the III Corps, would link Lannes and Vandamme. Napoleon ordered
Masséna's IV Corps to capture Landshut and the Isar River crossings, cutting
the Austrian line of communications.
Having found an easy crossing of the Abens, Wrede’s men were
somewhat ahead of the general advance, approx. 3kms west of Kirchdorf and north
of Siegenburg. The morning light glinted off the Bavarians accoutrements of war
as they began crossing fields toward the small village a Picard and the waiting
Austrians. On their right flank the Austrians 2nd Uhlans moved
forward, supported by a battery of horse artillery and a battalion of Grenz. The
Bavarian commander, Rechburg, in the centre, immediately ordered to veer left
toward Picard, allowing the following 1st Dragoons and 1st
Chevauleger room to advance.
Opening move by the Bavarians
As viewed by the Austrians.
The Austrians respond. Uhlans and horse artillery move up,
Grenz in support.
The Austrian Brigadier of the right flank ordered his
skirmish line forward, accompanied by the General’s aide-de-camp, for extra
encouragement. “Steady your aim, boys. Let ‘em have it!”
With urging from their officers, Bavarian left (brigade) surged forward (Forward tasking)
The Bavarian skirmish line close in on the Austrian skirmishers, seeking to throw them back.
In response, the Uhlans move up to charging range, threatening the
Bavarian’s right flank. 
The Austrian skirmishers fall back in front of the cannon of
the Bavarian 1st brigade. The ADC stayed with them and was very
satisfied to see an artillery man fall to the accurate skirmishers volley.
Wasting no time with polite introductions, the Bavarians
charged, led by 2nd battalion. In the face of some spirited
defensive fire (2 casualties), the Bavarians halted and returned desultory fire
(0 casualties). [Note: We should have split the casualties with one of the
supporting battalions, as per the rule for multiple targets. However, the lead
unit will always get the most hits.]
As
feared, the Uhlans lowered their lances and charged. Note that the infantry had already formed into squares, having won initiative in this moment. The artillery had also moved aside. These maneuvers were to leave the 2nd Brigade out of position for the course of the battle. [We expected to see a
modifier in favour of the Lancers vs normal cavalry, but this is not the case.
They are rated as Battle Cavalry however, which may be due to their lances.]
The 1st
Chevaulegers galloped forward to support and the spinning melee was
inconclusive. A second round was needed. The 1st Dragoons elected to
Stand and Fight!, knowing they had support. The Uhlans had made their mark (scoring
3 casualties to their 2) however and chose an orderly withdrawal.
Unperturbed by the Austrian musketry, 1st
battalion took the lead, charging unsupported on the far left. The Austrians
had warmed to the task scoring 4 hits. Again, the Bavarians halted and returned a
smattering of ineffective fire. (Note that the smoke here is for the photo only and does not represent a loss of fire discipline).
The points go to John so far, but this fight has just begun.
Both sides spent a turn in finessing their dispositions.
The Bavarians Dragoons charged. There was a question about charging the Uhlans instead, but the guns were the priority target, so the die were cast, so as to speak. Unfortunately for the Bavarians, the defensive fire was appallingly effective, resulting in 5 casualties. Not too many troops can make a successful charge after that, and the Dragoons were thrown back. (Note that the smoke here is for the photo only and does not represent a loss of fire discipline).
Meanwhile on the other flank, the 2nd was ready to lead the charge again, with the ADC urging them on (with an Infantry Assault tasking). Again, the Austrians denied them, adding another casualty.

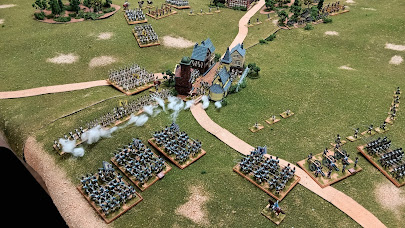
This is how the battlefield looked after turn 4. Note the Austian skirmishers covering the gap between the village and the woods.
Winning initiative for turn 5, the Austrian limbered up his horse artillery from the left sending toward the gap, where the skirmishers were advancing. The Bavarian commander elected to take his cat, in the form of the Chevaulegers, and throw them at the Austrian pigeons. Squares became fashionable and good rolling not so. The skirmishers, which had fled with alacrity, failed to hit and the battery defending the hill suffered a fatigue casualty.
There was more to like here for the Bavarian as the big ol' Austrian line lost all discipline.
Even better for the Bavarian, the 2nd brigade artillery was finally in a position to fire (at the Uhlans) and their opening volley was worth the wait.
Sensing victory, the Bavarians charged the Austrian right again, with Elan. In confusion the Austrians became unformed. "We have them now!" an overconfident infantry officer was heard to exclaim. John got his dice back on track. Well played, sir.
Ooops! Spoke too soon. Another loss of fire discipline. This time the Bavarian C-in-C stepped in to give troops a boost. This time the Austrians were sent packing and this is where we called it.
Thanks to John for setting up this rule test. Throughout the two days of play we consulted the rule book and made unbiased determinations based on the rules as we read them. We found the forums were another way of checking any 'stickier' situations. Looking forward to our next test.


Great to read this report of your earlier test game with John, Steve. Your photos are beaut and show John's lovely figures to perfection. Playing down the table looks really good too. Making the formations more dense and allowing for manoeuvre and a 'building' action.
ReplyDeleteI look forward to your account of your next game!
Regards, James